How to Spin Pizza Dough Like a Pro!
Tossing pizza dough up into the air doesn’t just look cool – it’s also a fantastic way to form a crust by stretching out the dough’s base.
I remember dining at local pizza spots and being mesmerised by the cooks in the back. They’d toss and spin the dough up into the air, above their heads, only to catch it safely in their hands. It looked effortless, and from that moment on, I knew I wanted to learn how to cook pizza like a pro. And this includes storing, preparing, and spinning pizza dough the right way!
If you also find yourself wanting to learn how to toss pizza dough, keep reading. I’ve written this with you in mind.

Step 1: The Preparation Process
Before starting, lightly coat your work area with flour, remove all jewellery from your hands, and put on your favourite apron. Keep a small bowl of flour nearby.
Next, you want to prepare your dough. Make sure it warms up to room temperature since cold dough won’t stretch too much, making it harder to toss. Dust your ball of dough with flour.
Before you start with the stretching process, make sure your pizza dough is kneaded to perfection. If you’re using store-bought dough, make sure it was made with yeast. If so, it will be fine for tossing.
Step 2: Stretch the Dough
Prepared some fantastic dough? Congrats! You deserve a pat on the back because this can be the most difficult part of the pizza-making process.
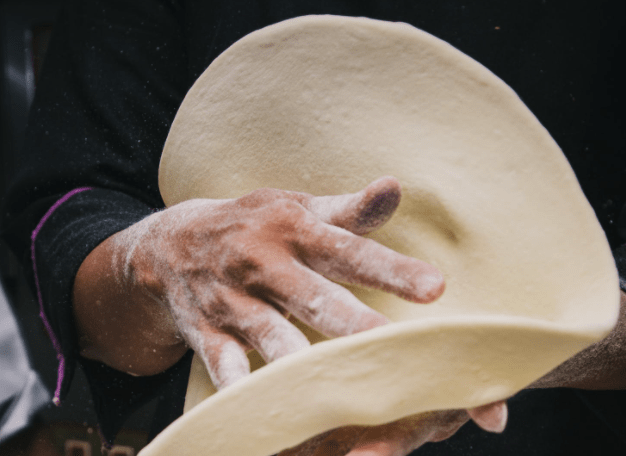
Now you’re ready to stretch. Begin by draping the dough over the back of your hands. Keep hands very close together with your knuckles bent inward and facing down. This will prevent poking holes with your fingers.
Stretch the dough to about 8 inches in diameter using only your hands. Once this has been accomplished, you’re ready for your first toss!
Step 3: Let the Spinning Process Begin!
The key to an amazing toss is pushing upwards and rotating your hands in a circular motion all at the same time. The easy part is pushing upward. However, the part you’ll have the most trouble with is rotating it. This takes some practice.
One hand needs to be palm up, and the other in a fist. The hand with the palm up will be used to push upwards and rotate, and the hand in a fist will be there for support and to catch! You want to catch the disk on the back of your fists.
Note: The hand that is palm up is your “throwing hand.” This is the hand you’re most comfortable with, so if you’re right-handed, that hand should be palm up.
Step 4: Catch the Dough
Once you have the dough up in the air and flying, don’t forget you have to catch it! It’s easy to get awestruck as you see your pizza up in the air. However, what goes up must come down, so make sure you’re ready to catch it.
You’ll want to catch the dough with the back of your hands, just like you initially stretched it. Don’t try to catch it with your fingers out because you’ll most likely poke your fingers through it and have to start all over.
Catching the dough on the backs of your hands/fists provides a flatter, more stable area when compared to the palms of your hands or fingers.
Step 5: Repeat
You want to repeat the tossing process until the dough reaches the size you want. I recommend aiming around 12 inches. Another quick tip: when tossing, make sure your fingers are closed and NOT spread apart.
My Best Piece of Advice
One of my greatest pieces of advice when teaching others how to spin pizza dough is to practice. Pizza dough is very cheap to make. When you have the free time, make extra dough just to practice tossing it. In case you didn’t know, you can even buy fake dough to work on your tossing techniques. Or, practice with a damp dishtowel.
Before you know it, you’ll be graciously tossing pizzas up in the air, giving you the confidence you need to host great family dinners or gatherings.
Final Thoughts
I do want to point out that there are other easy to stretch out dough that doesn’t require tossing it up in the air. These include stretching it out with your hands; however, this often leads to tears and holes. If you’re serious about making pizza, I highly recommend working your way up to spinning it. The process is well worth it (and quite enjoyable!).
With that said, I’m hopeful this guide has served useful to you, and you find success in spinning pizza dough. Don’t get discouraged if you don’t succeed on your first attempt. It took me several pizzas landing everywhere but my hands until I finally got it right. And when I did, it became second nature. Same will happen for you!
Best of luck to you and happy cooking!


